Interactive Video Tutorial
The Interactive video content type allows you to add interactions on top of video clips. Interactions such as images, elaborating text, links and quizzes pop up while the learner watches the video.
In this tutorial you will learn:
- When to use Interactive videos
- How to create an Interactive video
Click "Get started" button to explore all possible ways for using H5P
Example
Here's the Interactive video we'll create in this tutorial:
When to use Interactive videos
Interactive videos are perfect when you already have a video clip that you want to enrich with interactive elements.
You can facilitate differentiated learning by adding in-depth information such as pictures, tables, text and links that the learner can interact with during video playback.
Include puzzles for the learners to solve at any given time in the video by adding Multichoice questions, Fill in the blanks, Drag and drop questions and Summaries.
Step 1: Topic
We'll use a very short video of redcurrants as a basis for this tutorial.
-> Berries from Fred Rune Rahm on Vimeo.
The video above is licensed with the Creative Commons Attribution ShareAlike license. (Video in MP4 format and WebM format(right click the video and choose "save as" to download)
Step 2: Video files
A video clip is the cornerstone of any Interactive video.
The .mp4 video format will work in most browsers. However, you should provide an alternative video in webm format just to be sure.
Opera browsers, for instance, does not support the .mp4 format at all. You can check which browsers support the .mp4 video format here.
In order to convert the mp4 video to a webm format, you can use an open-source converter such as Miro.
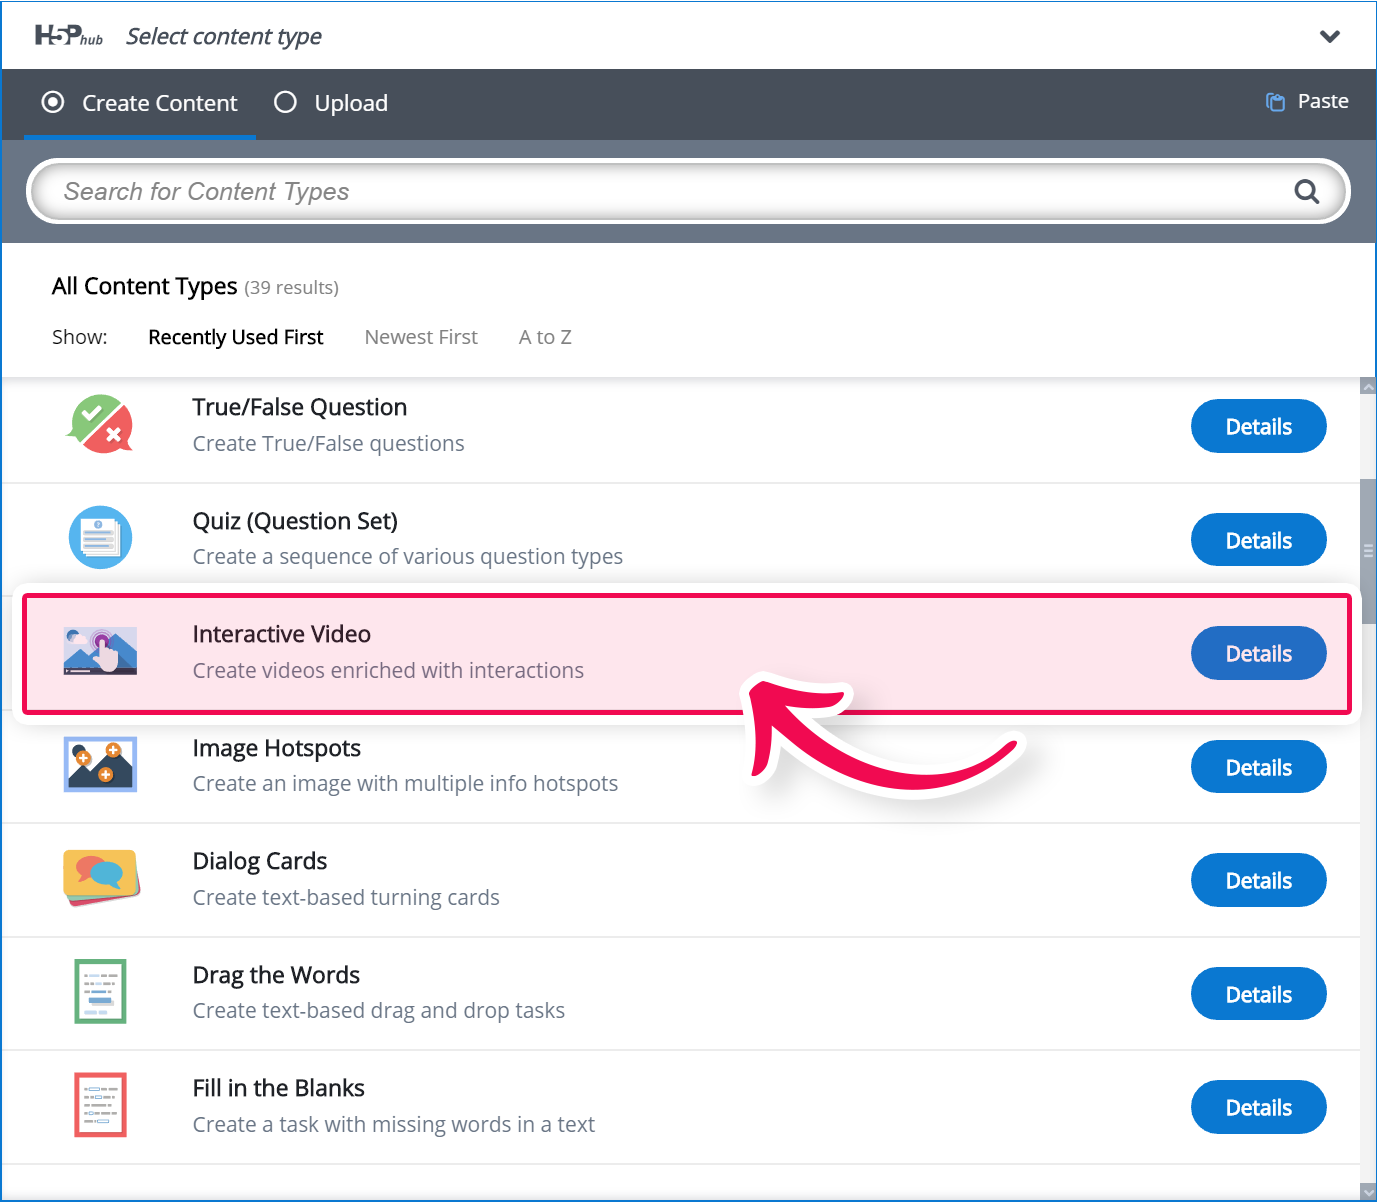
Step 3: Creating an Interactive video
Select the New content option and choose Interactive video from the list of Content types:
Step 4: Interactive video editor
The Interactive video editor should now appear. The top part of the editor looks like this:
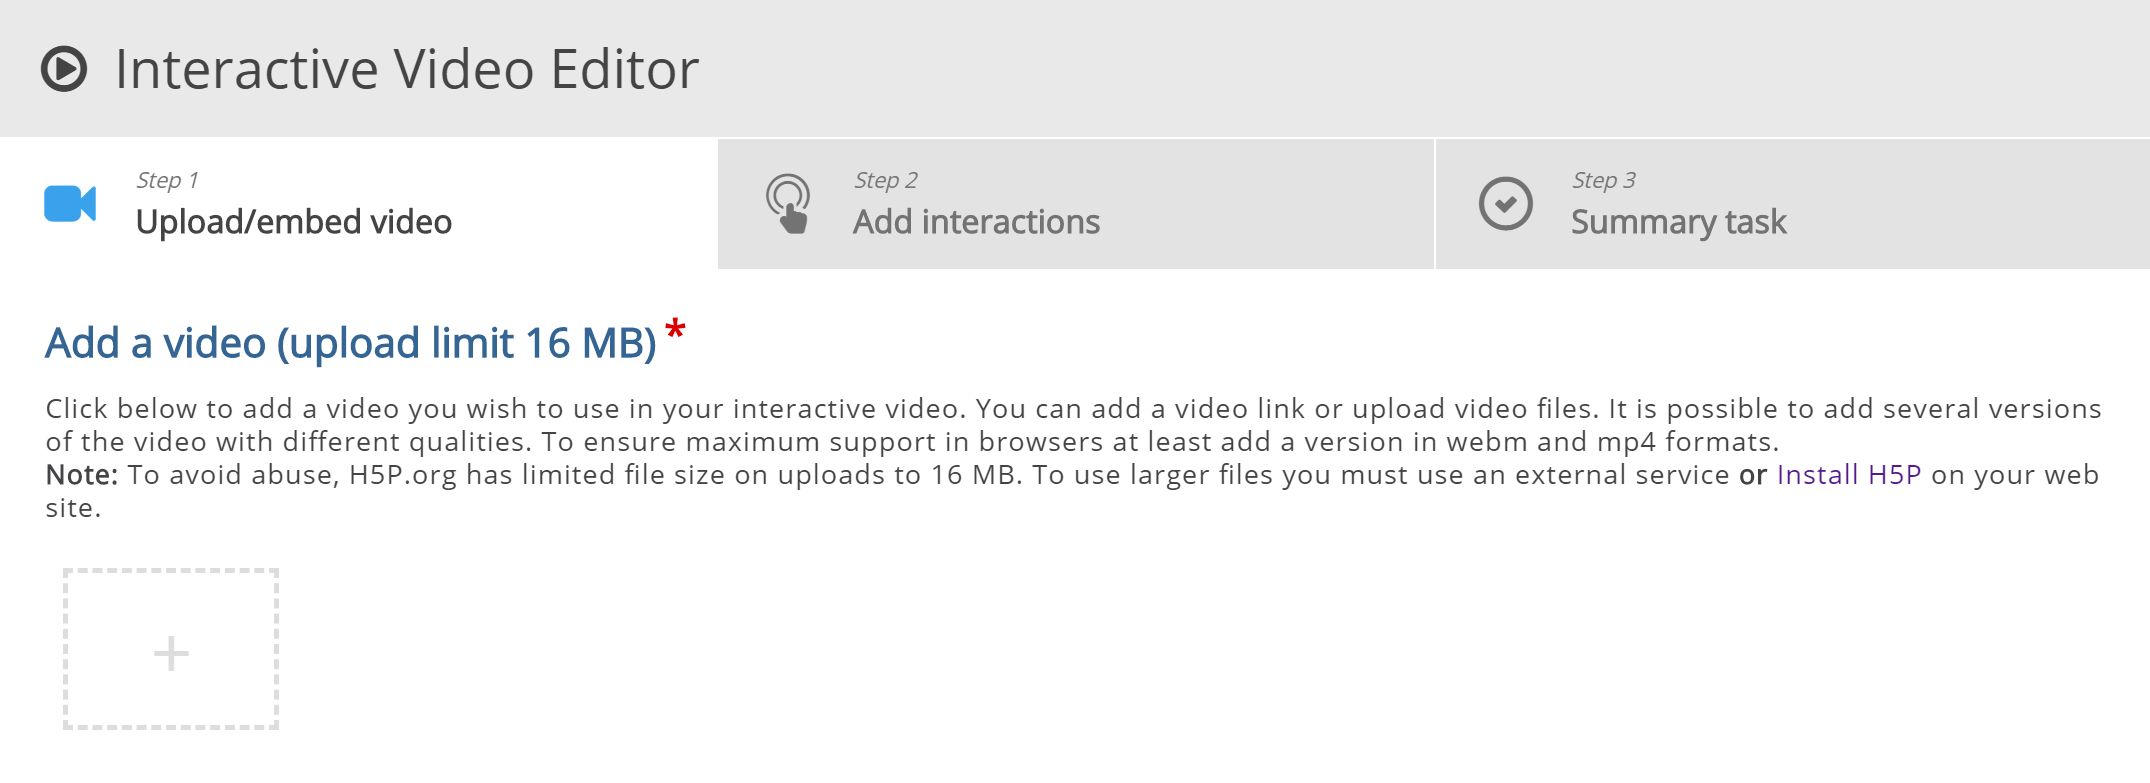
In this tutorial, we'll focus on creating the interactive elements in the video. Therefore, we'll focus on the top part of the editor, above the Common fields header.
The Interactive video content type consists of three tabs: Upload video, Add interactions and Summary task. These three steps represent a natural workflow for creating an Interactive video. By default, the Upload video tab is displayed when you create a new Interactive video, and this is what you always want to start off with.
Step 5: Upload video
Here's where we add the video clips that our Interactive video is based on.
Press the "+" button and than press the "Upload video file" button: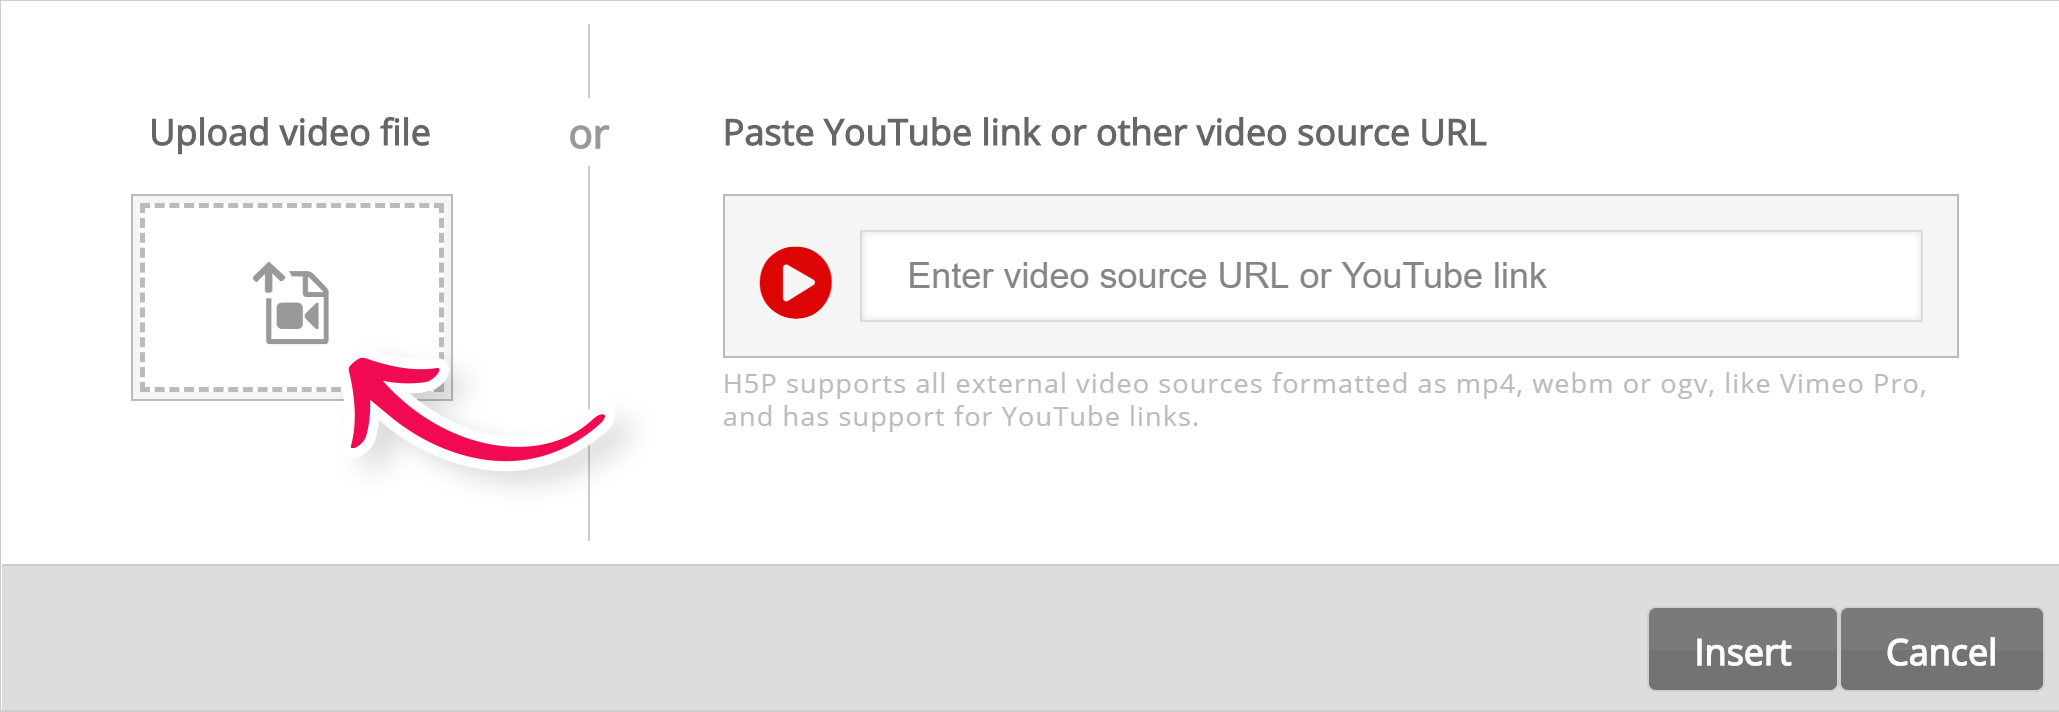
Browse to where you downloaded the mp4 video file from step 1 and upload the video. A square black icon with mp4 written in it, will appear:
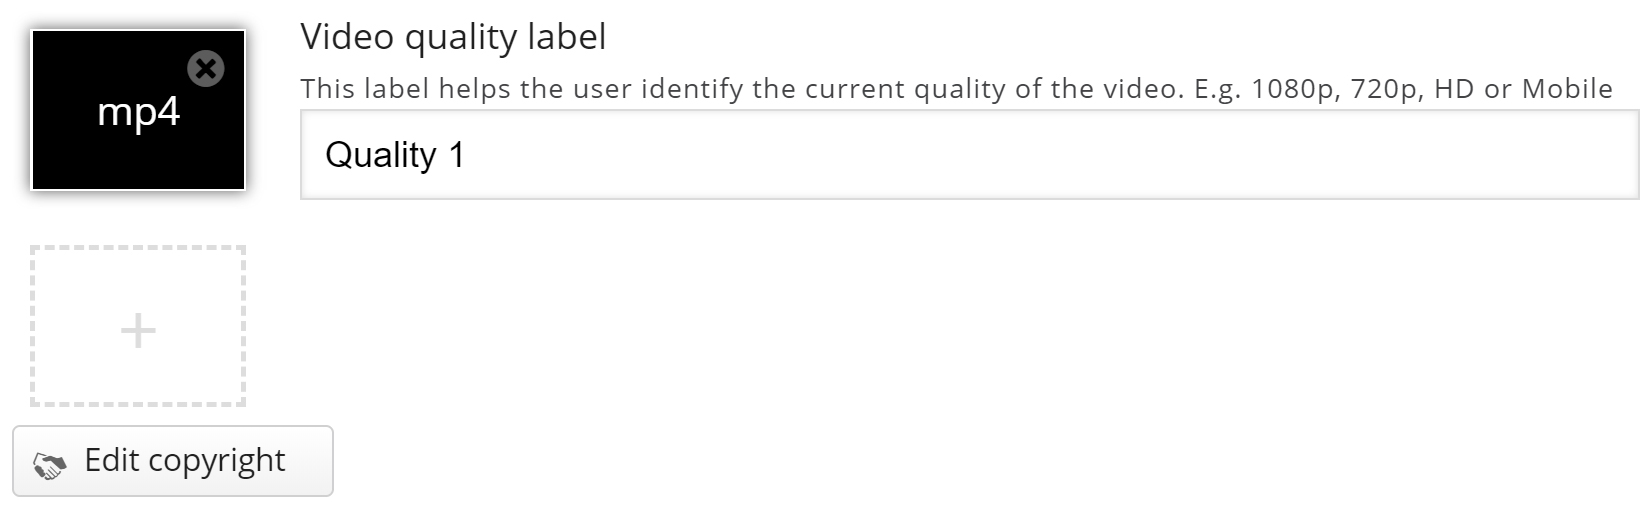
Press the plus button again to add an alternative video format to ensure support in all browsers. Locate and upload the video clip in webm format, that you converted from mp4 in step 2:
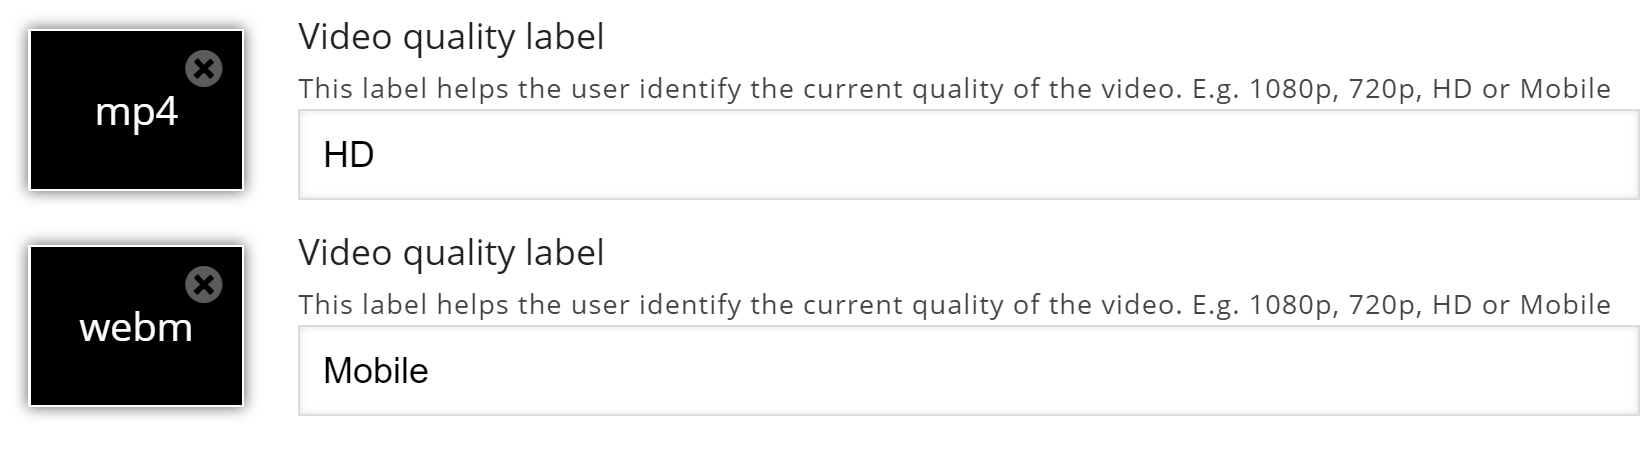
Add relevant labels for both quality levels. Now, edit the copyright information by pressing the Edit copyright button below the black video clip icons:
![]()
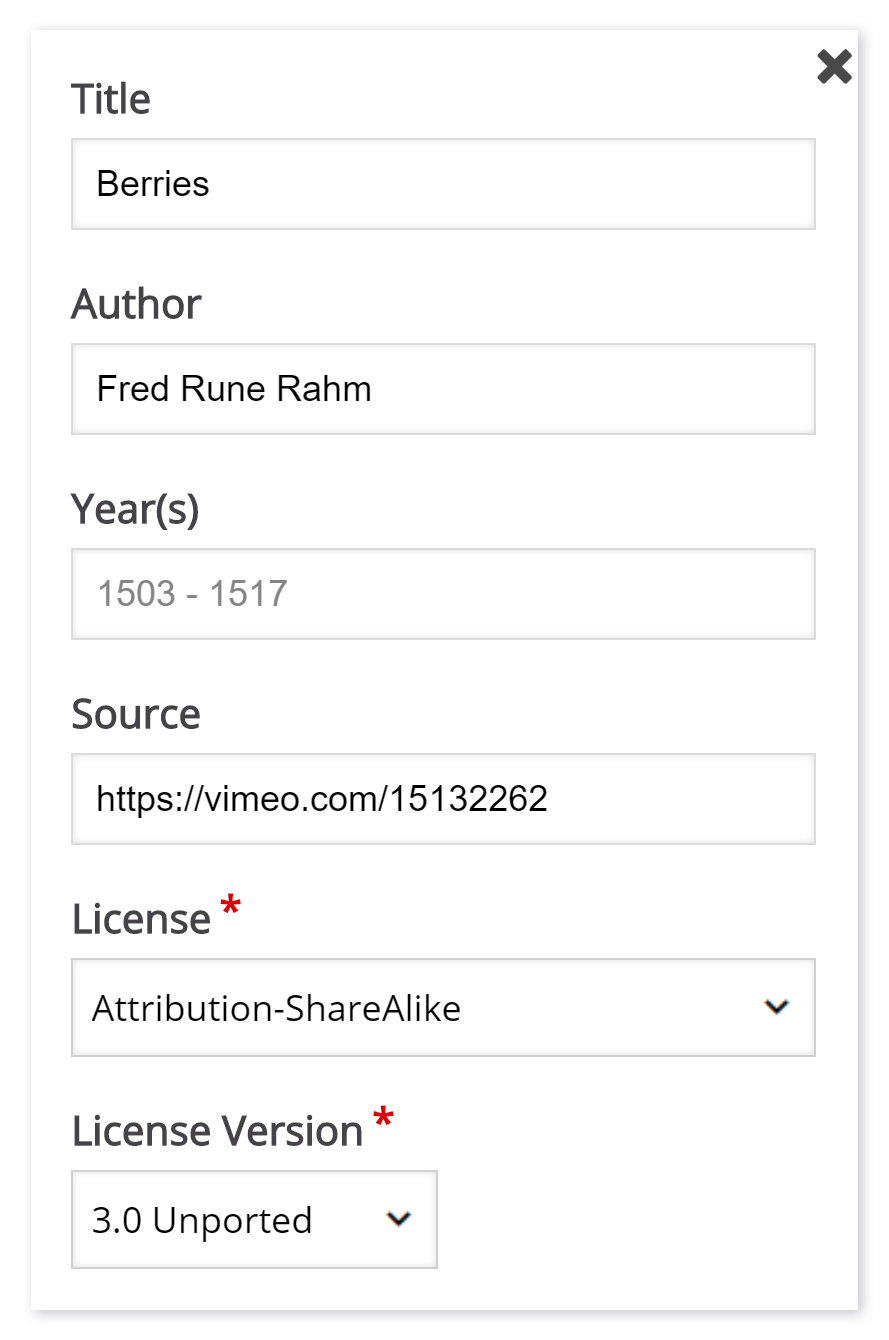
Since we are using a Creative Commons licensed video clip, we add the information below in the Edit copyright dialog.
Title: -> Berries
Author: Fred Rune Rahm
Source: https://vimeo.com/15132262
License: Attribution-ShareAlike
License Version: 3.0 Unported
Now that we've added our video files and copyright information, we're ready to add interactions.
Step 6: Add interactions
Press the Add interactions tab in the top of the editor. The video clip we added in the previous step is previewed:
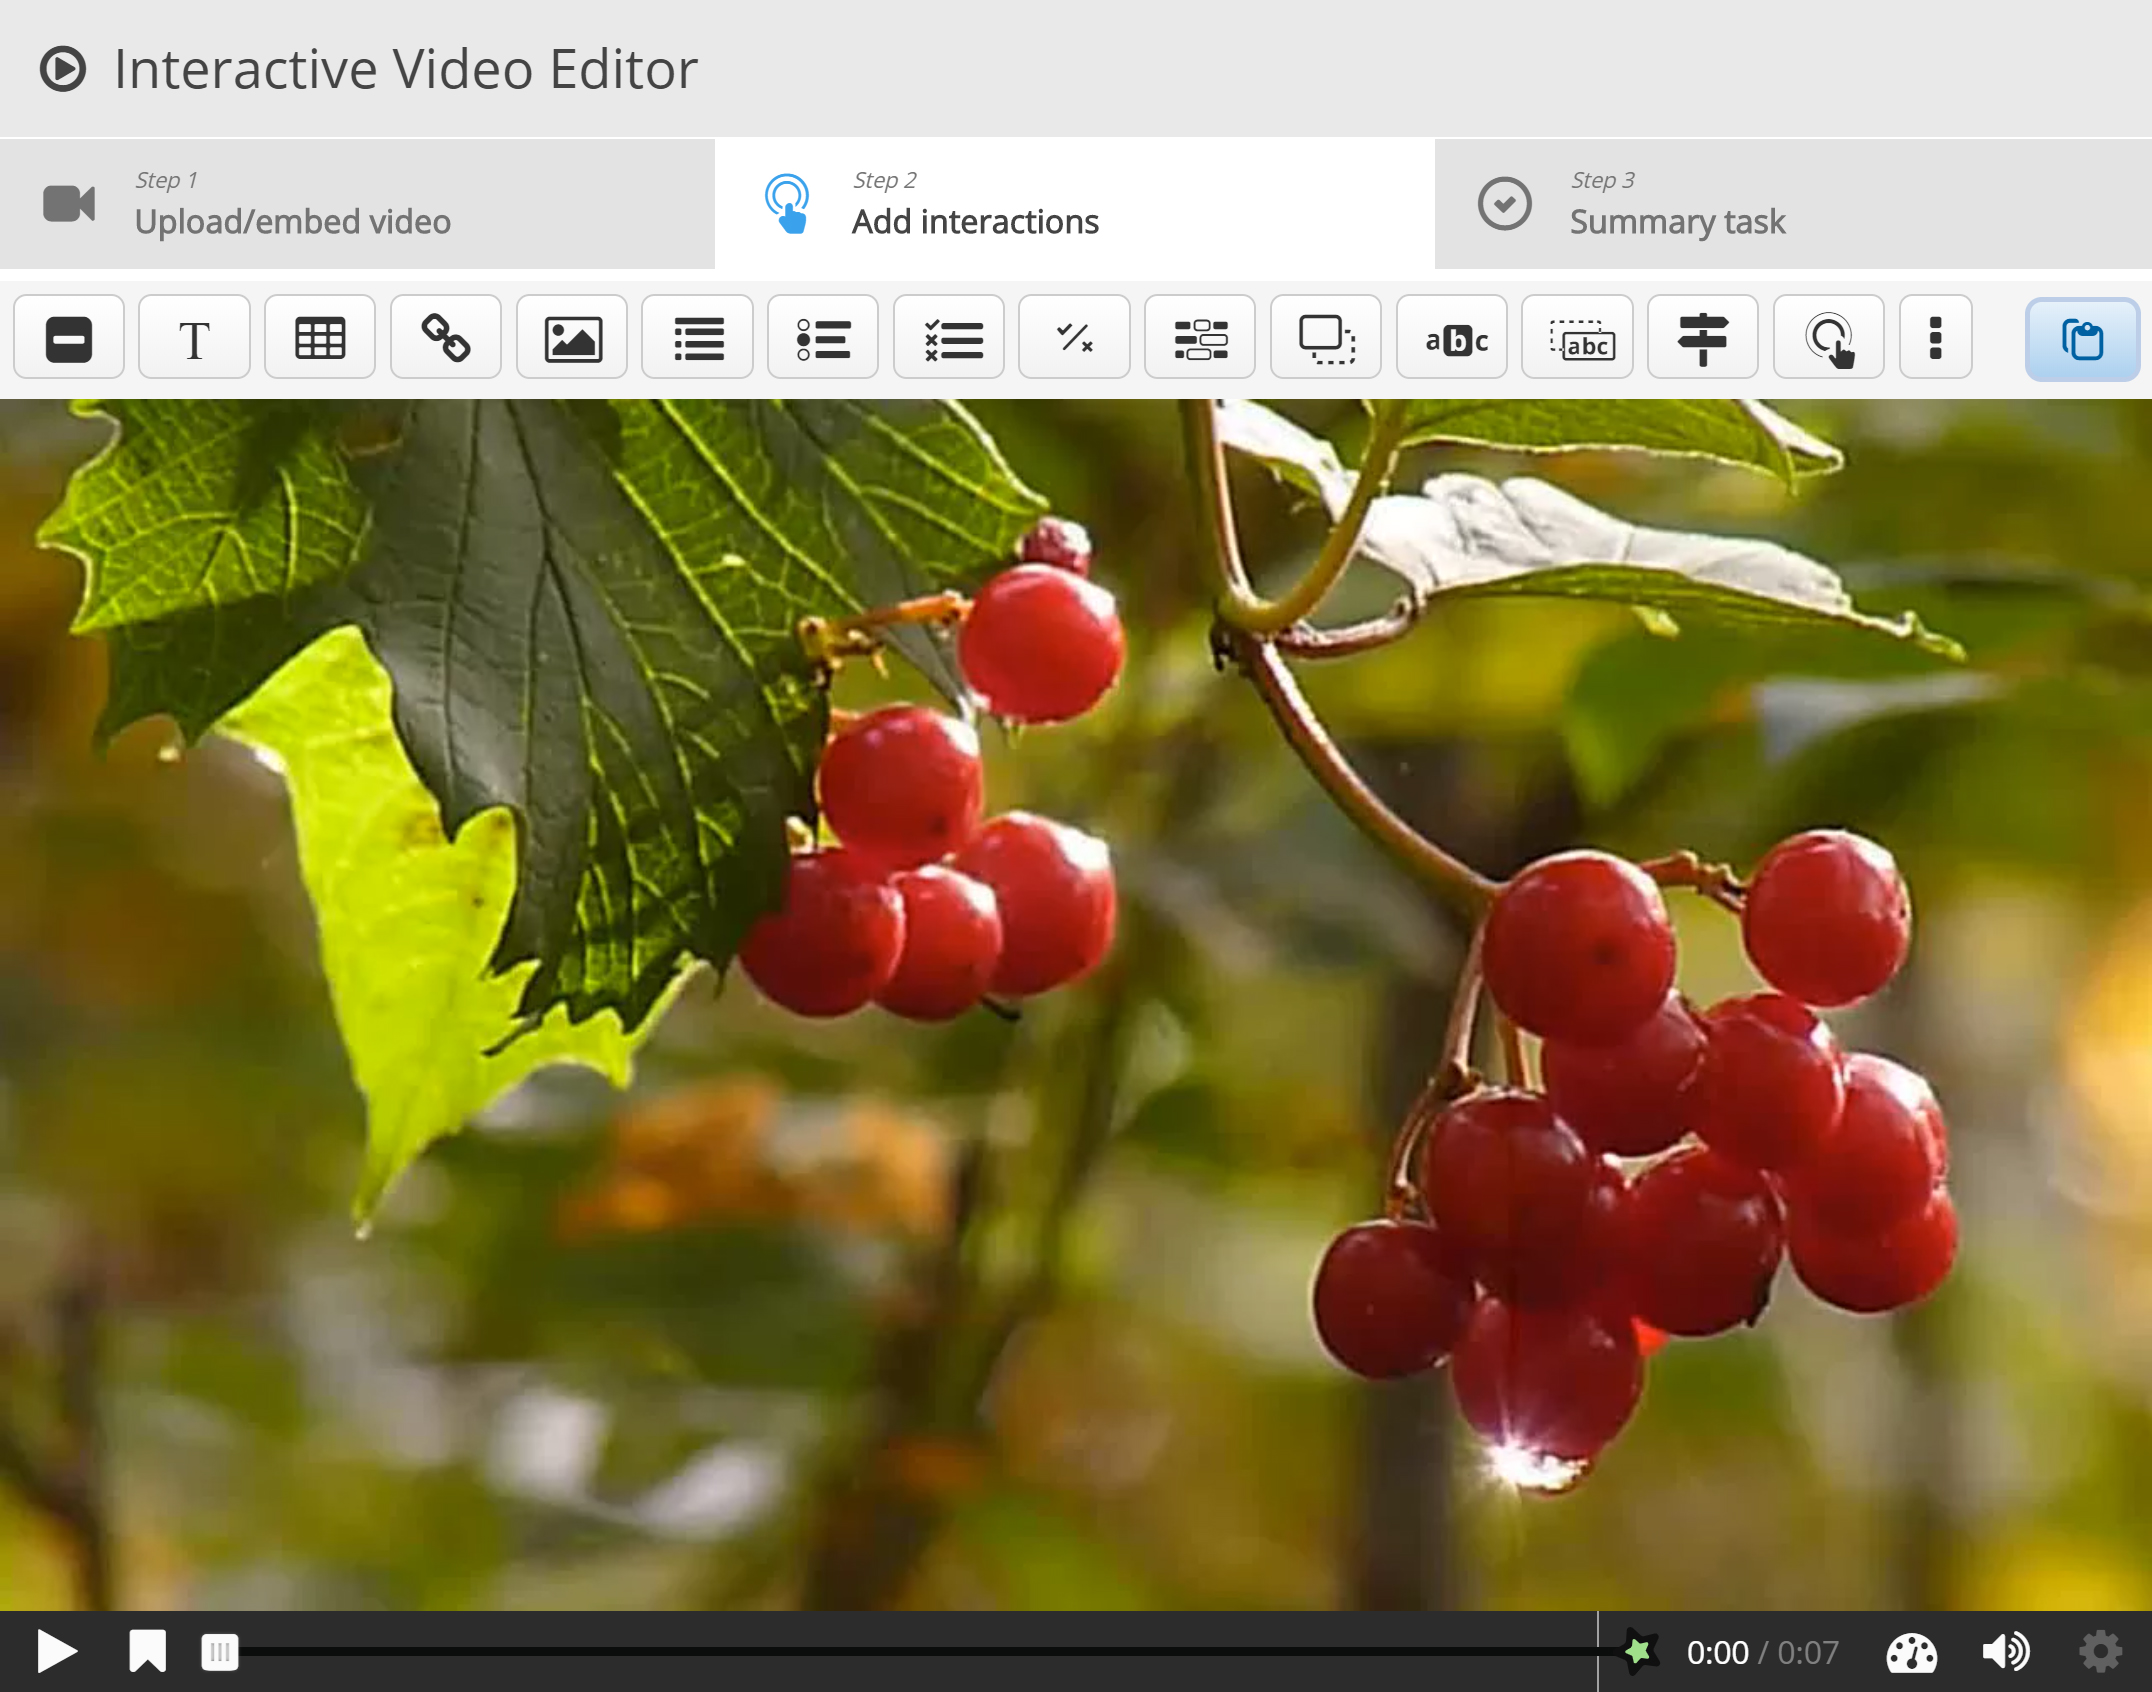
We use the toolbar above the video clip to add interactions:

There are three different types of interactions:
- Quiz interaction (Question), presented as a blue button
- Simple interactions (Text, Image, Table), presented as a purple button and
- Adaptivity (Go To) interaction
In this tutorial, we'll add a Text and an Image interaction.
Step 7: Text interaction
We'll add a short text about Redcurrants which the learner can choose to read.
First, add a Text interaction by pressing the Text  button on the toolbar, then drag it on top of the video and drop it in the middle of the video. A dialog will appear when you drop the interaction.
We want the text interaction to be visible in the first three seconds of the video. Type in 0:00 as start time and 0:03 as end time in the Display time field. In this case, we don't want the video to stop automatically when the interaction appears, so we'll leave the Pause checkbox unchecked.
The Label is a text that will be displayed next to the interaction icon as a short description of what the learner can expect to find in the interaction. Type Redcurrants in the label field.
In the Text field, we'll add the actual in-depth information text about Redcurrants paraphrased from Wiktionary:
Redcurrants are the bright red translucent edible berries of the Ribes rubrum shrub, which is native to western Europe.
Press Done. You will now see that an icon with the label Redcurrants has been added to the video:

A white dot has also been added to the timeline below the video, to indicate that an interaction is available at this point in the video:

Play the video to make sure the interaction is visible at the correct time.
Double-press on interaction icons to edit interactive elements.
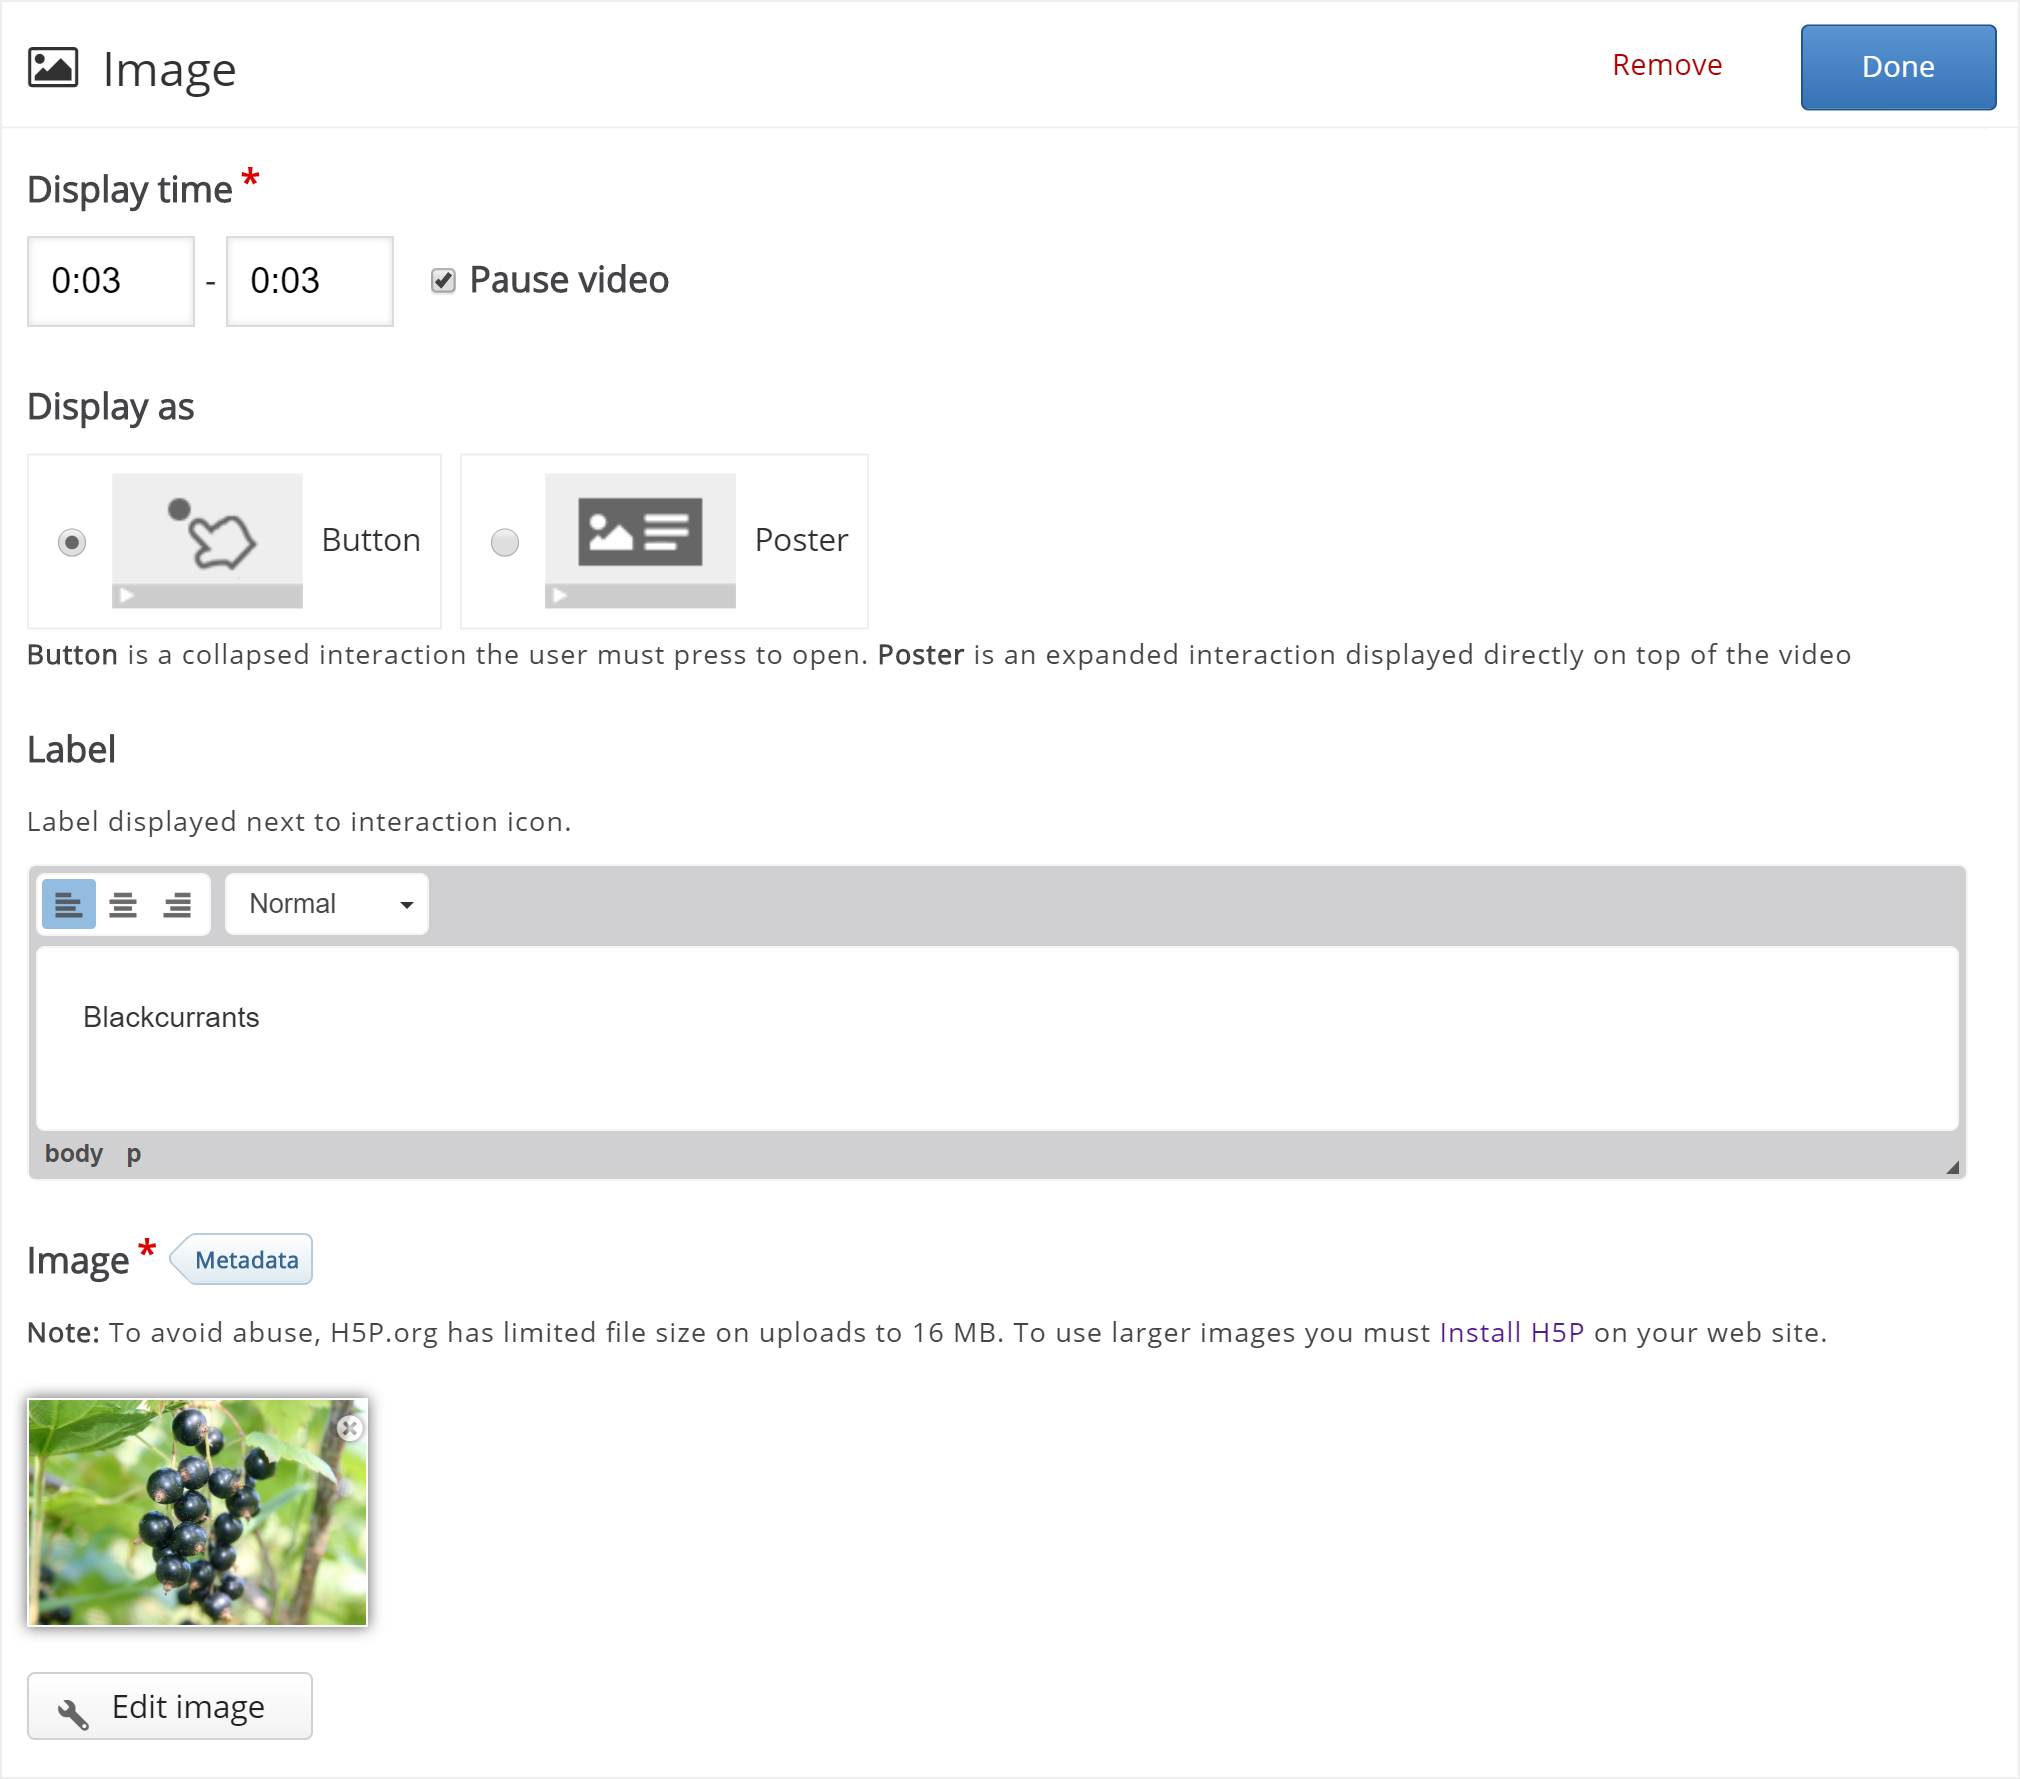
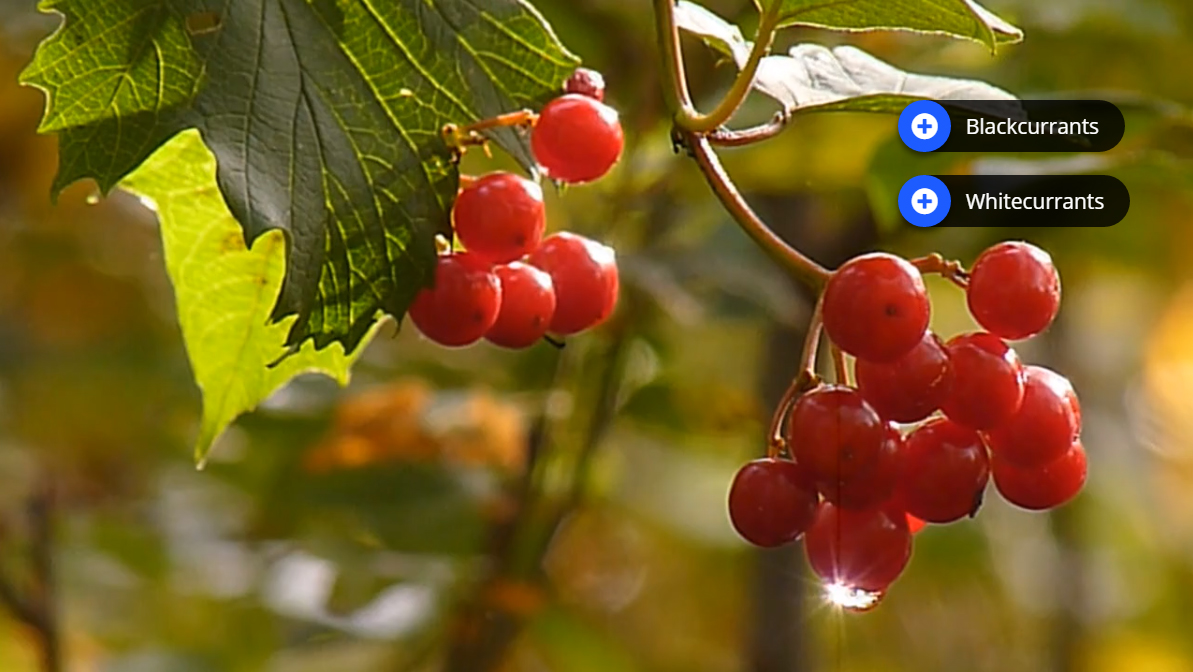
Step 8: Image interaction
We'll add two image interactions showing other types of currants which the learner can view by pressing on the image icons.
Below are links to the images found on Wikimedia Commons that we'll use:
You can add an Image interaction in the same way we added the text interaction. Press the Image  button, drag it onto the video and drop it where we want it to be placed.
In the first Image interaction we add the blackcurrant picture. In the Display time field, insert 0:03 - 0:03. This time we'll check the Pause checkbox, so that the video pauses when the interaction appears. Add the Label Blackcurrants. Also use Blackcurrants for the Alternative text and Hover text fields. Press Done.
Remember to add appropriate license information when using multimedia you don't own the rights to.
Finally, add the image of the whitecurrants and use the same settings as for the blackcurrant Image interaction shown above. Press Done when you have added the whitecurrant image interaction. You can move the interactions around by using drag and drop. Place them so you have something like this:
You can also add Multichoice questions, Fill in the blanks, Drag and drop questions and Summaries in Interactive videos. You add and place them in the same way as the Text and Image interactions. Please read the individual tutorials for these content types to learn more about creating them.
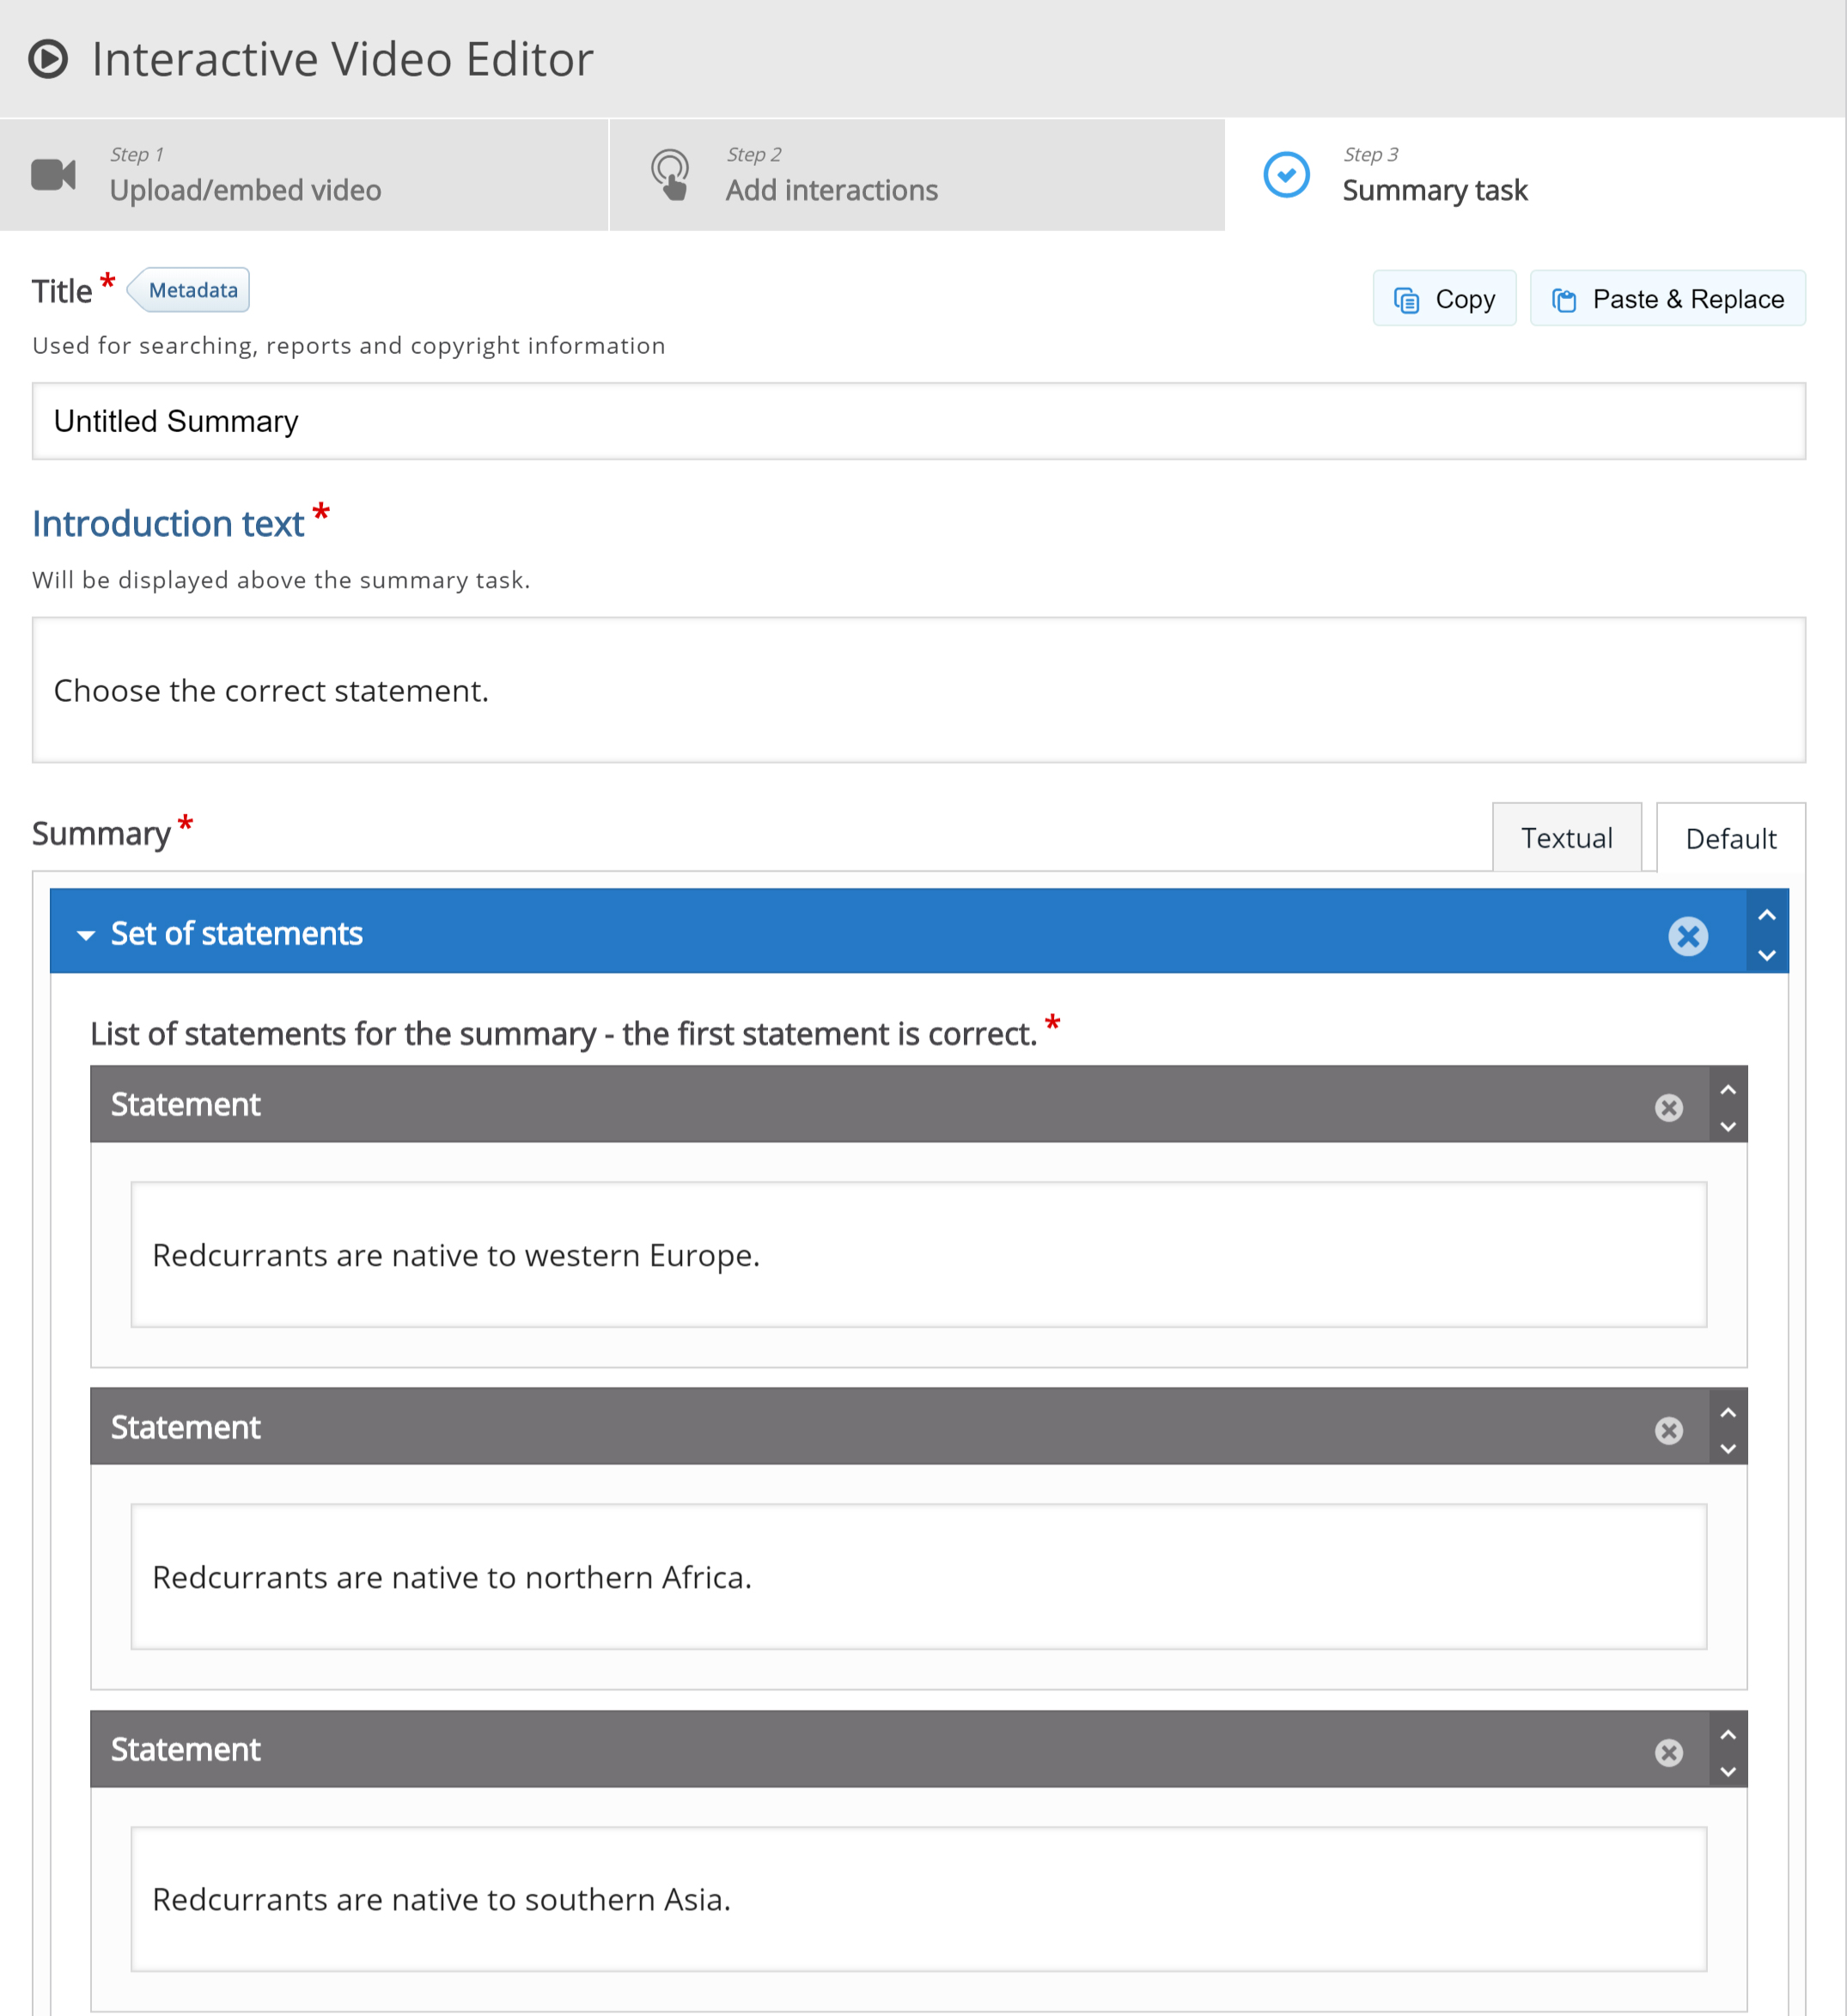
Step 9: Summary
At the end of an Interactive video, you can add a Summary. The Summary is intended to make the learner reflect on the learning content presented in the video.
We'll add two statement groups in the Summary. For a detailed description of how to create Summaries, you can read this tutorial.
In the first Statements group, add the following statements:
Redcurrants are native to western Europe.
Redcurrants are native to northern Africa.
Redcurrants are native to southern Asia.
The first statement is the correct one. You should now have something like this:
To create another Statements group, press the Add statements button. In the second Statements group, add the following statements:
Other currants include Blackcurrants and Whitecurrants.
Other currants include Bluecurrants and Yellowcurrants.
Other currants include Greencurrants and Orangecurrants.
The first statement is the correct one here as well.
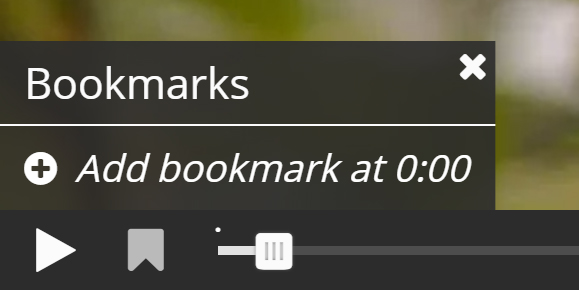
Step 10: Bookmarks
Although the example video we're using here is very short, we'll add a few bookmarks. Bookmarks are used to indicate a new topic, an important interaction or an event within the video.
Head back to the Add interactions step by pressing this tab in the top of the editor.

Bookmarks are displayed in the bookmarks menu, which is opened by pressing the Bookmark button next to the Play button:
![]()
You add a bookmark by moving the playhead to a desired point in the video and pressing the Bookmark button.
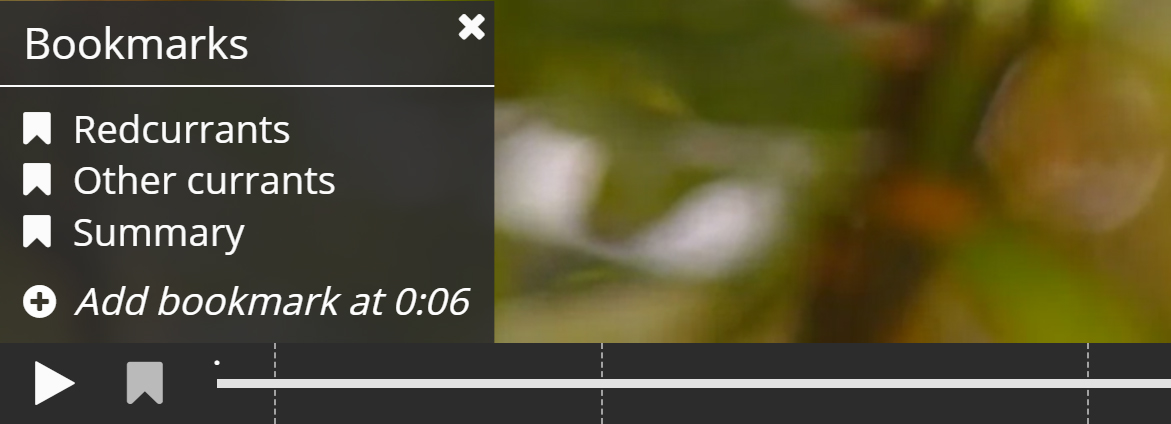
We'll add a bookmark where each interaction appears in the video.
Move the playhead to 0:00 and press the Bookmark button.
From the menu, press Add bookmark:
Add the label Redcurrants to the bookmark and press Enter on the keyboard.
Move the playhead to 0:03, add a bookmark and label it Other currants. Finally, move the playhead to 0:04 and add a bookmark labeled Summary.
Each bookmark is indicated with a vertical grey line on the seekbar. Learners can jump directly to a chapter by pressing the bookmarks in the bookmarks menu.
You should now have something like this:
You can edit a bookmark label by moving the playhead so that the bookmark you want to edit is displayed, place the cursor in the bookmark text and edit the text directly. You delete a bookmark by pressing the
button to the right of the bookmark label.
Step 11: Finishing up
Save the node/article to view your finished Interactive video.
You should now have the same result as the example referred to on top of the page.
We have only scratched the surface of what's possible with Interactive videos in this tutorial. If you have any questions, or think something is missing from the tutorial, feel free to leave comments and suggestions.
Comments
yaaasmina
Fri, 05/15/2015 - 20:51
Permalink
a probleme in showing my interactive vidéo on the home page
I have installed the plugin on my home page and when I make a new post with an interactive video , the post is showing void how can I show my video ?
falcon
Mon, 05/18/2015 - 12:28
Permalink
Could you provide a link? Are
Schmalfeldt
Tue, 06/16/2015 - 08:28
Permalink
Interactive video not working
Hi
A strange thing occurred to me: I tried the interactive tutorial and everything worked fine. Now it says ‘unable to decode media’. Even the same thing happens when I try to watch the example video http://h5p.org/node/735
I am on Wordpress, Mac, Firefox 38.0.5
Is anyone having any idea?
falcon
Tue, 06/16/2015 - 11:41
Permalink
I tried http://h5p.org/node
Schmalfeldt
Wed, 06/17/2015 - 10:03
Permalink
Everthing is fine now!
Now it works perfectly. Thanks!
falcon
Wed, 06/17/2015 - 14:56
Permalink
:)
developerjr
Fri, 08/21/2015 - 07:12
Permalink
Hello, first of all very
Hello, first of all very thanks for your valuable tool, I have a question : there is a way to pause the videos automatically when they arrive at a chosen time?
fnoks
Tue, 08/25/2015 - 09:43
Permalink
Another user asked the same
Another user asked the same question in out forum. You'll find it here: http://h5p.org/node/3878
alexfurr
Thu, 03/03/2016 - 11:46
Permalink
Branching Narrative feedback
hi =- the new branching narrative features works very well. However, I've feedback from staff that they are not finding it because the 'signpost' icon you have for it has the title "Click and drag to place go to question" which doesn't make sense. i.e. its not great english. Could it be changed to either "Click and drag to add branching narrative" of "Click and drag to add question based 'Time jump' " or something like that.
Hope that makes sense
Alex
falcon
Thu, 03/03/2016 - 15:49
Permalink
I agree with you. The name is
I agree with you. The name is confusing in many ways. I don't think it should include the word "question" at all. Let's make sure we find a good name before we do the change. So suggestions are:
I'm leaning towards branching narrative or crossroad. Branching narrative might be a bit too sophisticated? Crossroad also has a second meaning that works well in a dilemma context so I kind of like it. What do you think?
alexfurr
Thu, 03/03/2016 - 16:33
Permalink
Crossroads! Makes sense to us
Crossroads! Makes sense to us here...
mopasamedia
Sat, 06/11/2016 - 01:23
Permalink
video size-limit
Anybody know which is the maximum video-limit size?
I tried to upload 32 mb without success.
falcon
Mon, 06/13/2016 - 11:34
Permalink
On H5P.org the limit is now
On H5P.org the limit is now 16 MB. You may use YouTube or host your video externally in some other way to be able to use larger videos.
mopasamedia
Thu, 07/21/2016 - 20:22
Permalink
Thanks!!!
Thank you for you answer!!
ScottJeffrey
Tue, 07/19/2016 - 21:40
Permalink
Transparent Text Box?
Is there a way to make the text box transparent?
thomasmars
Wed, 07/20/2016 - 09:55
Permalink
Hi Scott,
That is not supported natively for text in interactive video, however there are ways to add it.
You may change the css of the box by using a hook. We would also love a pull request for this if you decide to implement the feature :)
ajnouri
Sat, 07/23/2016 - 19:49
Permalink
"Enable to decode media"
Getting "Enable to decode media"
Environent:
Uploading directly to h%p account
Client bowser:
Firefox 47.0.1
File codec: (mp4 H.264)
ffmpeg -i GSC_0003.mp4
ffmpeg version N-79255-g6d7f566-static http://johnvansickle.com/ffmpeg/ Copyright (c) 2000-2016 the FFmpeg developers
built with gcc 5.3.1 (Debian 5.3.1-13) 20160323
configuration: --enable-gpl --enable-version3 --enable-static --disable-debug --enable-libmp3lame --enable-libx264 --enable-libx265 --enable-libwebp --enable-libspeex --enable-libvorbis --enable-libvpx --enable-libfreetype --enable-fontconfig --enable-libxvid --enable-libopencore-amrnb --enable-libopencore-amrwb --enable-libtheora --enable-libvo-amrwbenc --enable-gray --enable-libopenjpeg --enable-libopus --enable-libass --enable-gnutls --enable-libvidstab --enable-libsoxr --enable-frei0r --enable-libfribidi --disable-indev=sndio --disable-outdev=sndio --enable-librtmp --enable-libmfx --enable-libzimg --cc=gcc
libavutil 55. 20.100 / 55. 20.100
libavcodec 57. 34.100 / 57. 34.100
libavformat 57. 30.100 / 57. 30.100
libavdevice 57. 0.101 / 57. 0.101
libavfilter 6. 40.102 / 6. 40.102
libswscale 4. 1.100 / 4. 1.100
libswresample 2. 0.101 / 2. 0.101
libpostproc 54. 0.100 / 54. 0.100
Input #0, mov,mp4,m4a,3gp,3g2,mj2, from 'GSC_0003.mp4':
Metadata:
major_brand : isom
minor_version : 512
compatible_brands: isomiso2avc1mp41
encoder : Lavf57.30.100
Duration: 00:00:09.44, start: 0.000000, bitrate: 2512 kb/s
Stream #0:0(und): Video: h264 (High) (avc1 / 0x31637661), yuvj420p(pc), 1080x1440 [SAR 3:4 DAR 9:16], 2378 kb/s, 29.97 fps, 29.97 tbr, 30k tbn, 59.94 tbc (default)
Metadata:
handler_name : VideoHandler
Stream #0:1(und): Audio: aac (LC) (mp4a / 0x6134706D), 48000 Hz, stereo, fltp, 127 kb/s (default)
Metadata:
handler_name : SoundHandler
At least one output file must be specified
icc
Mon, 07/25/2016 - 10:07
Permalink
It looks like your browser is
It looks like your browser is having issues playing the video. You could try opening the video directly in your browser to see if it works.
It could also be related to something with your web server setup/configuration.
If you wish to learn more on how videos should be encoded to work best on the web, you can check out this guide: https://www.virag.si/2012/01/web-video-encoding-tutorial-with-ffmpeg-0-9/
jfelkl
Tue, 08/09/2016 - 17:59
Permalink
click drag and drop to place to go to question-funktion
Hello,
to continue the video after a correct answer I have to fill in a go to-time M:SS minimum a second later than the end of the display time M:SS so that a pice of information of the video is lost. If I take the same time I´m caugt in the loop. Ist there a solution that I don`t see?
Kind regards
fnoks
Wed, 08/10/2016 - 09:32
Permalink
Hi,Are you using the
Hi,
Are you using the adaptivity functionality or the Go To Question?
jfelkl
Wed, 08/10/2016 - 16:51
Permalink
go to question funktion
Hi, I am using the Go to Question funktion of the video editor. It is the plugin for Wordpress.
jfelkl
Wed, 08/10/2016 - 11:03
Permalink
go to question funktion
Hi, I am using the Go to Question funktion of the video editor. It is the plugin for Wordpress.
fnoks
Thu, 08/11/2016 - 09:30
Permalink
I see you are correct. If
I see you are correct. If your Go To Question is displayed at 1:00 (display time: 1:00 - 1:00, pause: on) in a video, you need to goto 1:01 to not get into a loop. I.e, one second is lost.
jfelkl
Thu, 08/11/2016 - 14:27
Permalink
It´s a pity
Unfortunately this reduces the practicability of this interessting tool, because important information might get lost. I would appreciate if the tool could be developed to solve this item for the next version. Perhaps so that goto same time means "same time plus one frame". Is it realistic? Kind regards Jürgen
fnoks
Fri, 08/12/2016 - 09:45
Permalink
It would be great if you
It would be great if you could add this as an issue on the relevant GitHub repo. At this point, I think this issue would need funding to be implemented since no-one has mentioned this problem before. Another option is that someone in the community implements this when seeing the issue in github!
andreachieppa
Mon, 08/29/2016 - 16:15
Permalink
Moving Interaction point
Hi,
is it possible to create moving interaction point? For example, an interaction point that during a video follows a subject?
Tnx
thomasmars
Tue, 08/30/2016 - 11:08
Permalink
Hi,
This is not possible at the moment. It is a very good idea! It would require some experienced developer work :)
Thomas
PedroCuencas
Mon, 09/05/2016 - 23:24
Permalink
Mobile Support
Most of the content modules work on mobile, but this one (Interactive Video) does not seem to show up at all on mobile. Is this a known issue?
thomasmars
Tue, 09/06/2016 - 08:49
Permalink
Hi,
Interactive Video should work well on Android.
Are you using iPhone ? There is an issue for adding supports for iPhone in the next release.
PedroCuencas
Wed, 09/07/2016 - 21:13
Permalink
Yes, I was using Iphone. That
Yes, I was using Iphone. That's great news regarding the support in the next release.
Thank you for the information.
sbarab
Tue, 11/28/2017 - 15:08
Permalink
on iphone
I am still having trouble seeing this on iphone. it always goes to full video mode and i lose ability to see interactive controls. Any thoughts?
tim
Mon, 12/04/2017 - 16:03
Permalink
Which iOS version are you on?
Which iOS version are you on?
zaherballar
Tue, 10/11/2016 - 09:49
Permalink
Hide seeker in video player
Hi, how could I Hide seeker for interactive video player without touching library H5P core.
timothylim23
Tue, 10/11/2016 - 10:03
Permalink
Hi, there isn't an option
Hi, there isn't an option right now to hide the seeker however we have added functionality that disables the seeker bar. It is in development now and should be ready in the next release (hopefully in a month's time). You can also try cloning the latest version (which has this functionality) on github if you're familiar with how it works:
https://github.com/h5p/h5p-interactive-video
zaherballar
Tue, 10/11/2016 - 09:53
Permalink
Triggering events on specific point in progress
I want to trigger an event once user pass specific progress in the video, is this possible with H5P Interactive video, how shuould this be implemented without touching H5P core files
thomasmars
Tue, 10/11/2016 - 10:27
Permalink
Hi,
Each question that has a score within interactive video sends an xAPI event when they are completed. You can catch these xAPI events using the method explained in the H5P and xAPI guide.
zaherballar
Tue, 10/11/2016 - 11:02
Permalink
Hi, Thanks for your feedback
Hi, Thanks for your feedback.
is there a way to know if the user has been watching more than 75% of total video duation without adding questions
thomasmars
Wed, 10/12/2016 - 09:16
Permalink
Hi,
There is no way of doing that right now out of the box. You would have to implement a specific library hook for this. These can be implemented by reading the respective guides for drupal and wordpress.
jwd2135
Wed, 10/19/2016 - 04:20
Permalink
Captions
Is there a way to add captions to the video?
thomasmars
Wed, 10/19/2016 - 08:53
Permalink
Hi,
Unfortunately it is not currently possible for Interactive Video. Captions are supported for the H5P Video library, so adding it to Interactive Video should not be a terribly big job, however there are some design concerns. H5P is steadily working on improving the accessibility of the core content types so hopefully this will get prioritized soon :)
- Thomas
MariaN
Fri, 10/21/2016 - 15:55
Permalink
Open ended question in video
Is there a way to add an open ended question, just like adding a multiple choice question at one point in the video? I was thinking of a pause at one point then asking the students a question and then students can right their thoughts real time, using the same application. Thank you
timothylim23
Fri, 10/21/2016 - 15:58
Permalink
Open Ended questions
Hi Maria, a new questionnaire content type has been released with the ability to add open ended questions. Please see the release note for details:
https://h5p.org/oct-2016-interactive-video-improvements
It will be on the examples page in a few weeks but for now you can go directly to the following address:
https://h5p.org/questionnaire
MariaN
Mon, 11/14/2016 - 21:43
Permalink
Open Ended Questions
Great! I am amazed by how you respond to queries and the how you look at improving the app to enrich student experience! Thank you.
MariaN
Wed, 11/16/2016 - 18:30
Permalink
Open ended question in video follow up question
Hi again, Timothy. I went over the video improvements and I found that yes, the question in the example was open ended but there were choices for the answers. I was wondering if an open ended question can be answered but about 3 - 5 sentences. In this case, the instructor will have to mark the responses manually and enter the grades manually as well.
Thank you.
thomasmars
Thu, 11/17/2016 - 09:24
Permalink
Hi Marian
The questionnaire content type is built up of pages. On these pages you can add either a multiple choice, where you will select a pre-defined alternative, or an open ended question, where you will write in free text in response to a question. The open ended question has the alternative of setting how many lines that the answer will be: 1,2,3,5 or 10 lines. Is this sufficient for your use case ?
Best, Thomas
MariaN
Fri, 11/18/2016 - 19:14
Permalink
Interactive video with open ended questions
HI, Thank you for your help, Thomas. Still, I could not add that type of interaction where I could pause the video and ask an open ended question. These are the steps I did:
1. Added an interactive content: Interactive video (Tab 1) .
.
2. Uploaded a video
3. Added an interaction, (Tab 2) among the choices in the top bar, I selected multiple choice or should it be a single choice set? I did not find a choice for an open ended question
Even for content types alone, did not find Questionnaire among the choices. Were we able to install the full version of the app? Is there an alternative?
I am building a Moodle shell for online instructors to help them create more engaging activities for the students.
Thank you very much.
tomaj
Mon, 11/21/2016 - 08:36
Permalink
Update, and look to the right
Hi Maria,
Just make sure you have the latest version of the Content Type, and you should have access to this.
Questionnaire should be the right most option, on the toolbar, inside interaction.
- Tom
thomasmars
Mon, 11/21/2016 - 10:50
Permalink
Enable Questionnaire
In order to enable Questionnaire you must make sure that the following option in H5P plugin settings is on:
"Enable LRS dependent content types"
Be aware that you need an LRS (learning record store) or a similar way of grabbing external events in order to store the actual answers submitted through the Questionnaire, so that you can review them at a later point.
gopalswam
Sat, 10/22/2016 - 18:47
Permalink
Forward of the video: Prevention
Hi, Can we ensure that the video cannot be forwarded without attending to the interactivities? This will ensure that the student completes the entire video.
thomasmars
Mon, 10/24/2016 - 09:24
Permalink
Hi, A new feature for
Hi, A new feature for preventing skipping in Interactive Video will be released in the upcoming release! However there is no way to enforce a user to actually attend the interactivities at the moment.
Pages